12 Premiere Pro Tips for Beginners You'll Actually Use
 Jordy Vandeput
17K views
Twelve Premiere Pro tips for beginners that save time on every edit: transform and crop clips right in the Program Monitor, round off corners, fix pale skin with HSL Secondary, close gaps in one click and stop choppy playback.
Every year I put together a list for people who just opened Premiere Pro. These are the Premiere Pro tips for beginners I'd hand a friend on day one: move and crop clips right in the Program Monitor, round off corners, fix pale skin, close gaps in one click and stop choppy playback. Twelve tricks, all built into Premiere.
The 12 Premiere Pro tips for beginners at a glance
Here's the short version. Each one is explained below, with the time in the video above where you can see it happen.
- Select Motion in the Effect Controls to move, scale and rotate a clip in the Program Monitor.
- Crop straight in the Program Monitor with the Crop option in its bottom-left menu.
- Give a clip rounded corners with the Rounded Crop effect.
- Zoom the Program Monitor with your scroll wheel and pan by holding it down.
- Fix skin tones with HSL Secondary in the Lumetri Color panel.
- Animate between logos with the 3D Spinback transition, then copy and paste it.
- Build a gradient background from a Color Matte and the Gradient effect.
- Generate a clip from a text prompt with the Generative media tool.
- Remove every empty space with Sequence > Close Gap.
- Mark a selection in the Source Monitor with I and O.
- Render heavy effects with Sequence > Render Effects In to Out and reuse those previews when you export.
- Lower the playback resolution when playback stutters.
Edit directly in the Program Monitor
Most beginners do everything in the Effect Controls panel. That works, but typing numbers into Position and Scale feels clumsy when you just want to drag something into place.
1. Transform clips without typing values
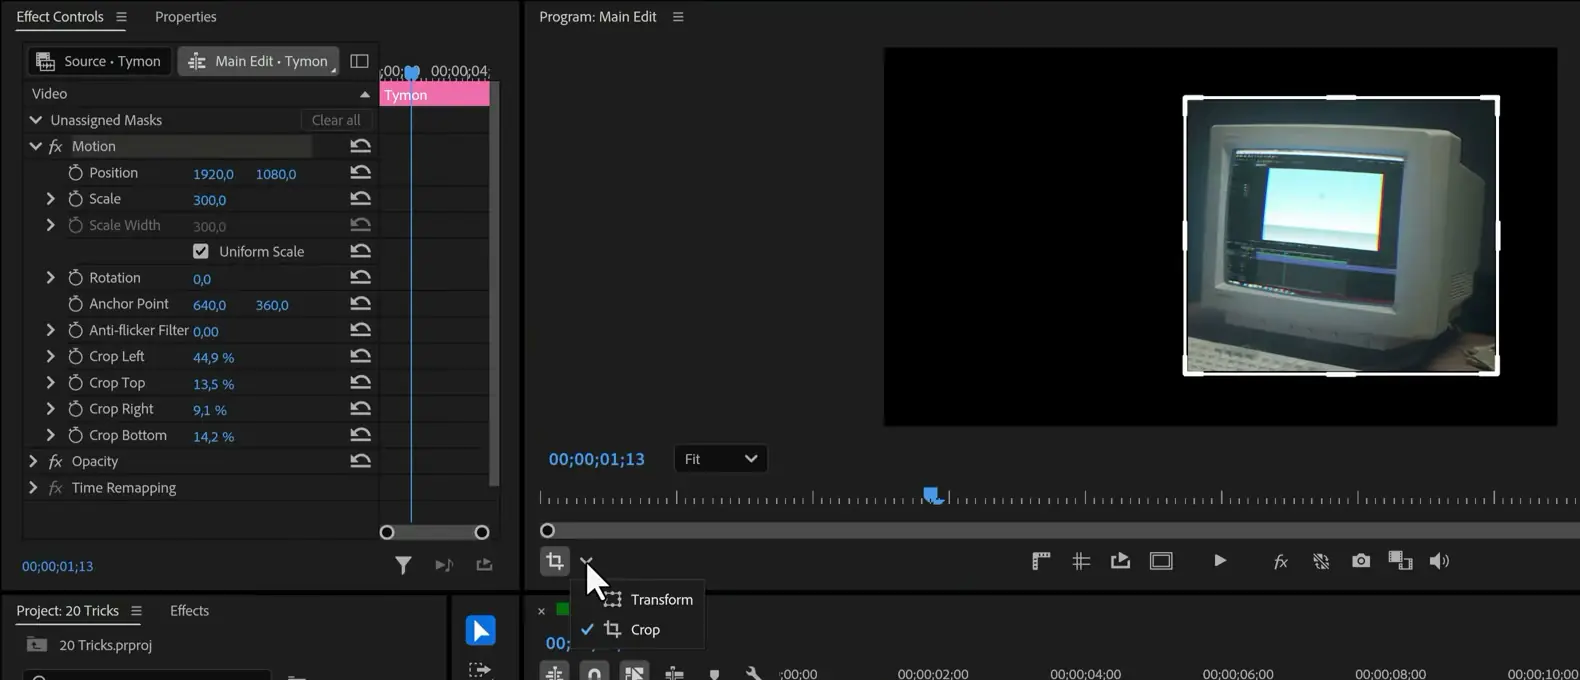
Select your clip in the timeline and look at the Program Monitor. Nothing happens when you try to grab it. Now click the word Motion in the Effect Controls panel and go back to the monitor: handles appear around your clip, and you can drag the position, pull a corner to scale it and rotate it. At 0:35 in the video you can see how much faster that is than nudging numbers. Huge time saver. A button in the bottom-left corner of the Program Monitor switches these on-screen controls on or off.
2. Crop without the Effect Controls
You don't need a crop effect for a simple crop anymore. Select the clip, open the small menu next to that same bottom-left button and choose Crop. Crop lines appear around the frame and you drag them wherever you want, then you switch back to Transform in the same menu to move the cropped clip, for example to the middle of the frame. If you don't see that menu, your copy of Premiere is older than the one in the video, so update first.
4. Zoom and pan the monitor
I'm jumping ahead to tip 4 because it belongs here. To zoom in on your Program Monitor, you can pick a percentage from the zoom menu (it says Fit by default), but the quicker way is to simply scroll your mouse wheel to zoom in and out. Then click and hold the scroll wheel to drag the view around.
This doesn't scale your video. You're only zooming your view, like zooming into a photo on your phone. Your export stays exactly the same.
Effects every beginner should know
3. Rounded corners with Rounded Crop
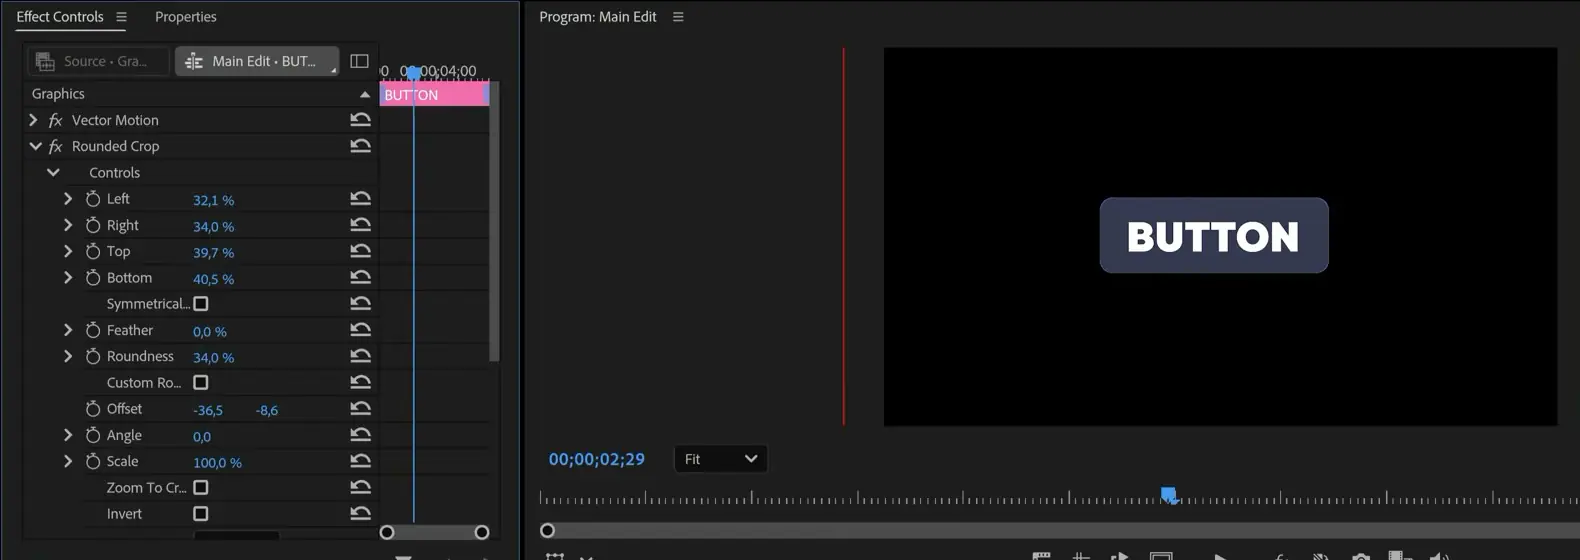
Want a clip or a graphic with rounded corners? Search for Rounded Crop in the Effects panel (it sits under Video Effects > Image Control) and drag it onto your layer. It crops just like tip 2, except you set the Left, Right, Top and Bottom values in the Effect Controls instead of dragging lines in the monitor.
Then raise Roundness. In the video I turn a plain title into a button that way. Go back and forth between the crop values and the roundness until the shape feels right.
5. Fix skin tones in Premiere Pro with HSL Secondary
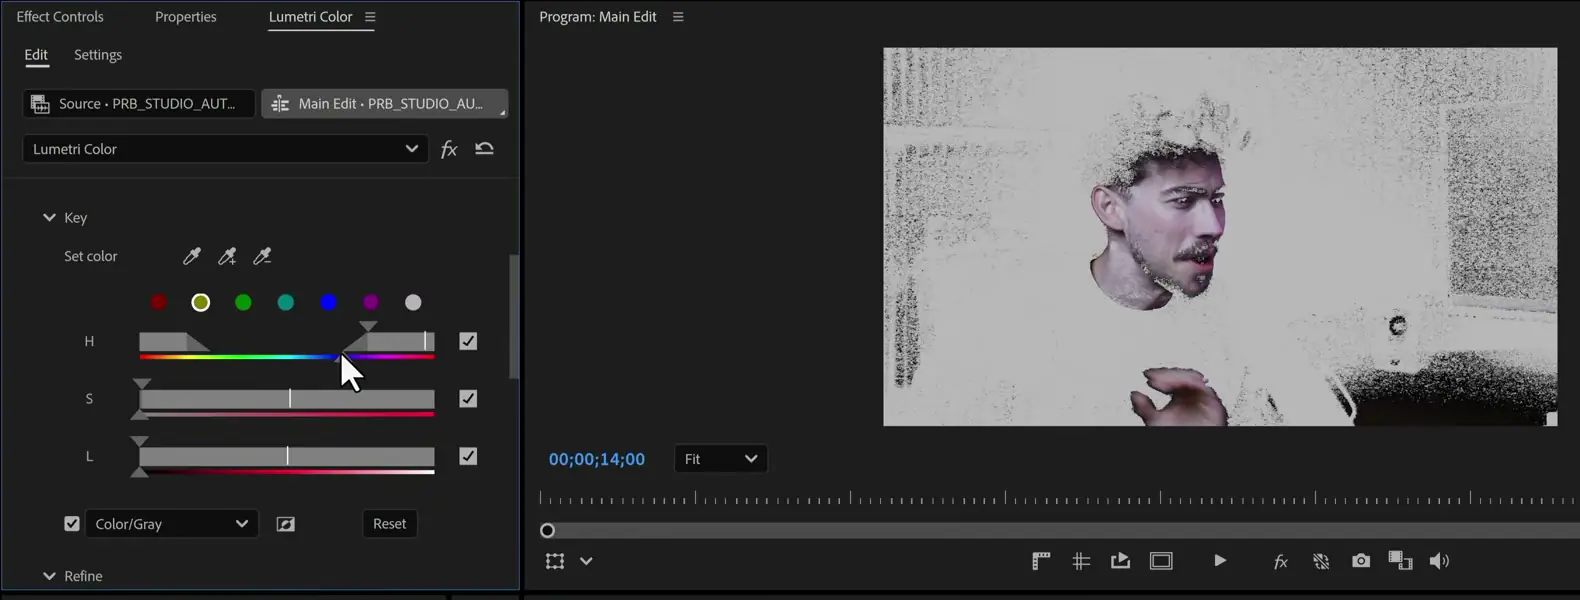
The face in this clip looks a bit pale, so let's give it some color without touching the rest of the shot. In the video I open Window > Lumetri Color, find the HSL Secondary section and scroll to Key. Click the Set color eyedropper, then click the skin in the Program Monitor.
That creates a selection. I always tick the Color/Gray checkbox next: everything outside your selection turns gray, which makes it far easier to judge. Now drag the H, S and L range sliders until only the skin keeps its color.
Untick Color/Gray again and scroll to Refine. Raise the Blur to smooth out the rough edges of the selection, then scroll further down and push the Temperature up just a little to warm up the skin. Compare before and after at 2:43 in the video: the skin gets warmer and the background stays as it was. One limitation: Premiere Pro 27.0 retired the Lumetri Color panel, so on the newest version you work with the Lumetri Color effect instead. I explain that change in Lumetri Color panel removed: 5 grading tricks, and there's a separate tutorial on getting perfect skin tones in Premiere Pro.
6. Logo animations with 3D Spinback
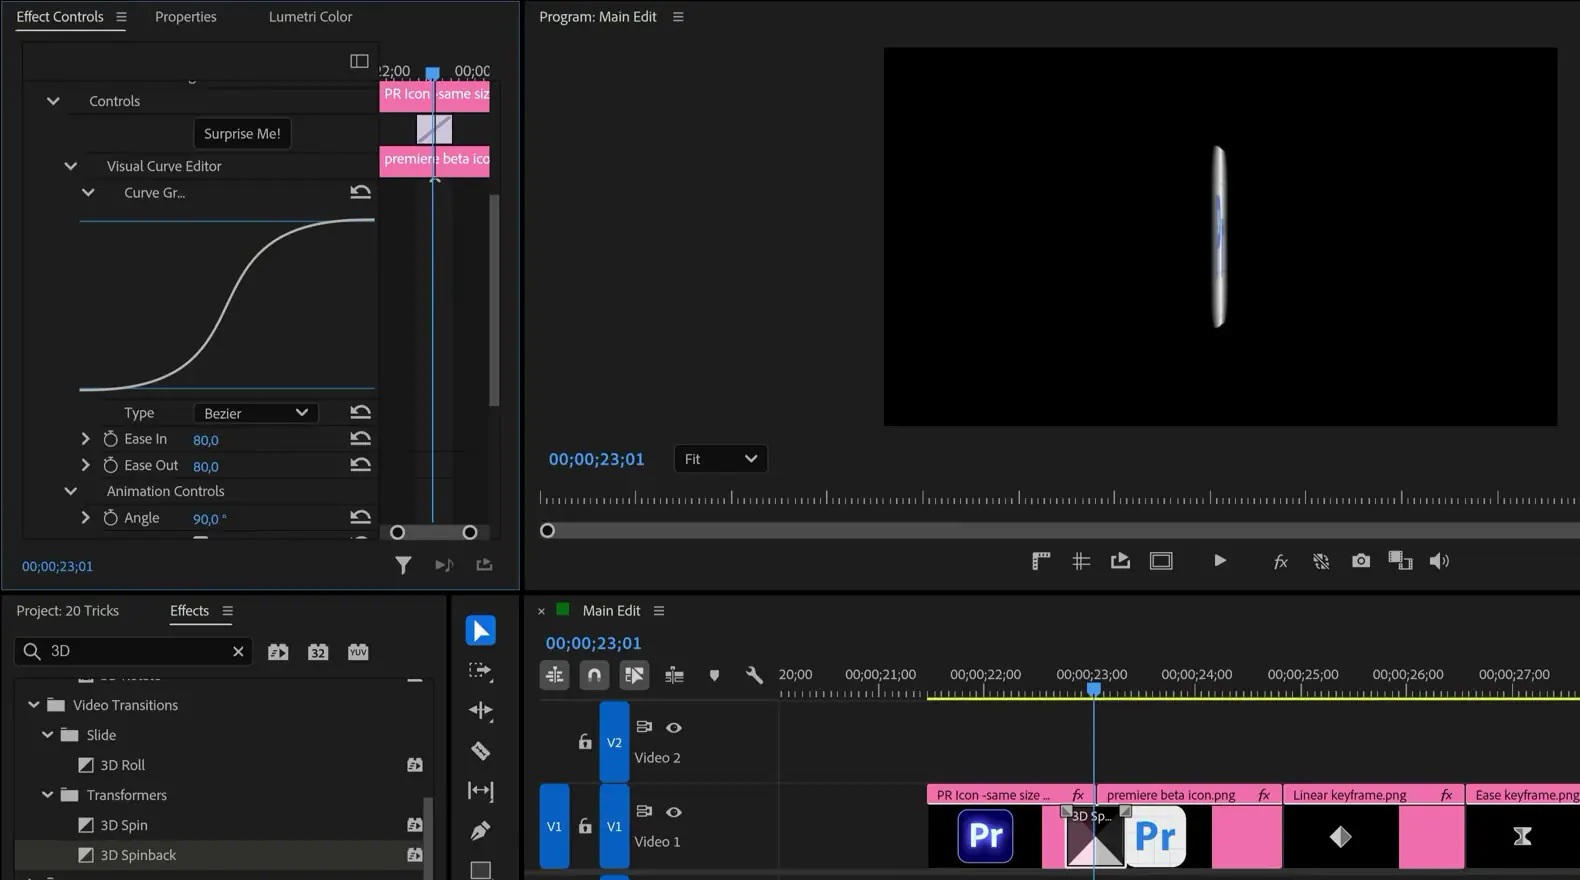
This is a transition I use a lot when I need a quick animation between two or more logos. Drop 3D Spinback (under Video Transitions > Transformers) between two clips, then click the transition itself and open the Effect Controls to see what you can change.
Almost everything is adjustable. The video uses a Bezier curve with Ease In and Ease Out at 80, an Angle of 90 and motion blur switched on. When it looks good, left-click the transition, press Ctrl + C and paste it between the other logos. Every cut gets the same spin in seconds. For more built-in options like this one, see these Premiere transitions that replace keyframes.
7. A gradient background in under a minute
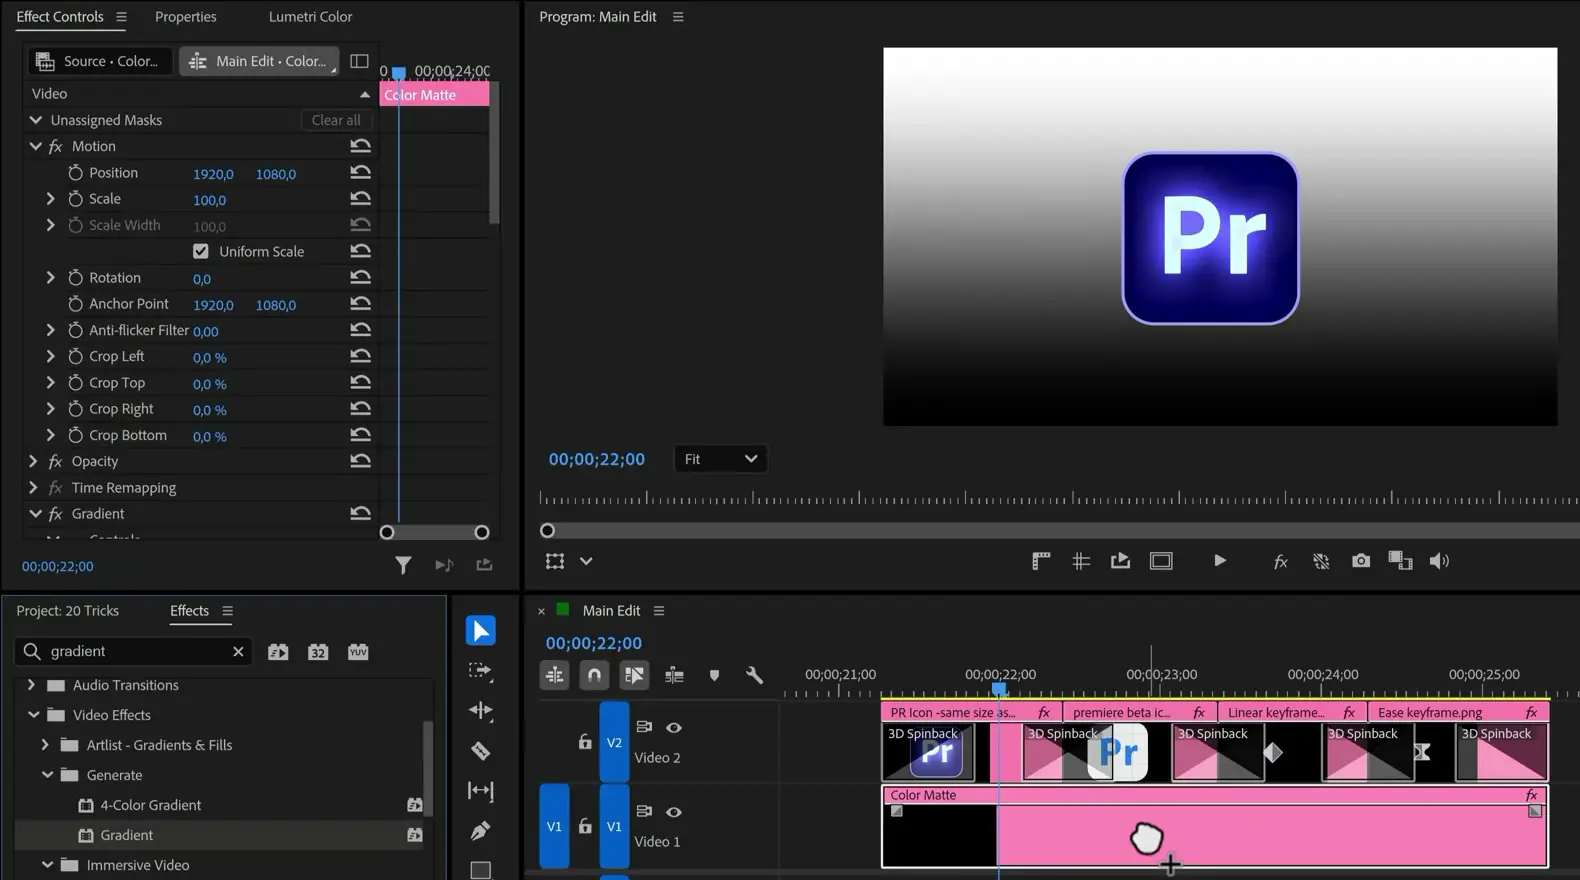
Click the New Item button at the bottom of the Project panel and choose Color Matte. Click OK, leave the color at black and click OK again. Drag the matte into your timeline under your animation and trim it to the same length. Now the fun part.
Next, find the Gradient effect in the Effects panel and drag it onto the color matte. You instantly get a default black-to-white gradient. In the Effect Controls you can pick any two colors you like; the video ends on a soft yellow that makes the logo pop.
Faster editing basics
8. Generate a clip with AI
I'm a big fan of this one, with one warning. Select the Generative media tool in the toolbar, then click and drag in the timeline to draw a clip, and a box opens where you type a prompt, for example "aerial shot". Choose your settings and click Generate.
Here's the catch: it costs generative credits. In the video the 8-second, 1080p clip says it uses 1,440 credits. When the account doesn't have enough, Premiere opens a page to buy more, and at 4:58 you can see me decide not to. Check your credit balance before you rely on it in a deadline edit.
9. Close every gap at once
Got a big project with lots of empty spaces in the timeline? Don't hunt them down one by one. Go to the Sequence menu and choose Close Gap. Poof, everything slides together.
10. Mark a selection with I and O
Double-click a clip in the Project panel and it opens in the Source Monitor. Play to where you want to start and press I for the in point. Then press O where you want to stop. That marks a selection, and when you drag the clip into the timeline only that part comes along instead of the full clip you would otherwise have to trim again. It's the habit that separates a slow edit from a fast one.
How to fix slow playback in Premiere Pro
11. Render your effects
If your video plays back slowly because of heavy effects, go to the Sequence menu at the top of the screen and choose Render Effects In to Out. You can also pick Render In to Out. It takes a bit longer, but it renders your entire timeline or your in-to-out selection. In the menu in the video, Render In to Out sits on Enter, the shortcut I use for this one.
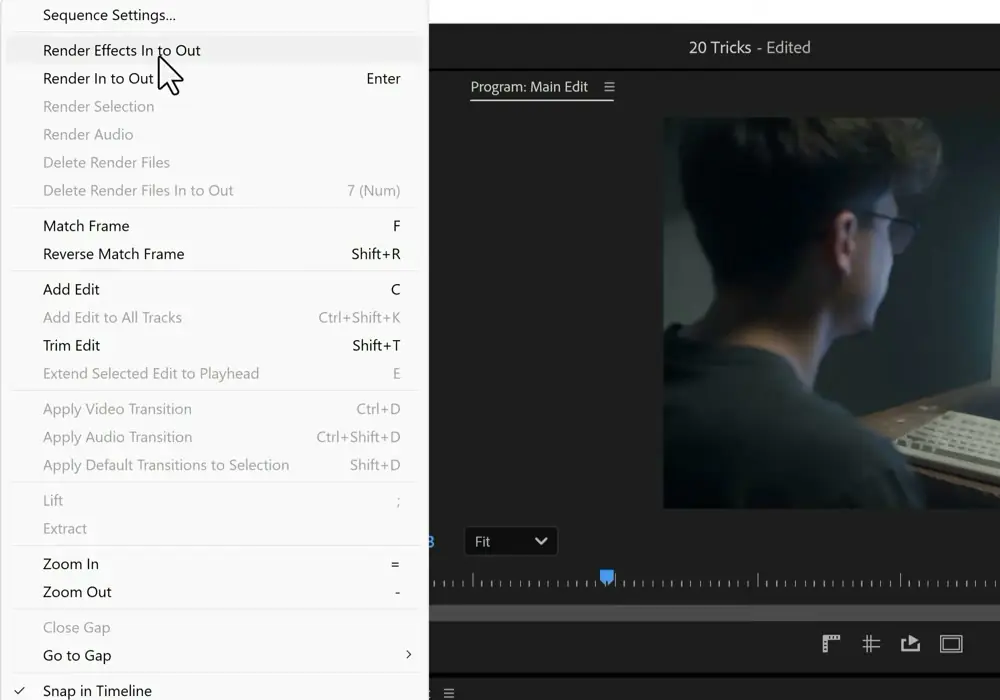
Watch the colored bar along the top of your timeline. Red and yellow mean Premiere has to calculate those parts while it plays. Once they turn green, that stretch plays back smoothly. More on that in rendering your timeline in Premiere Pro.
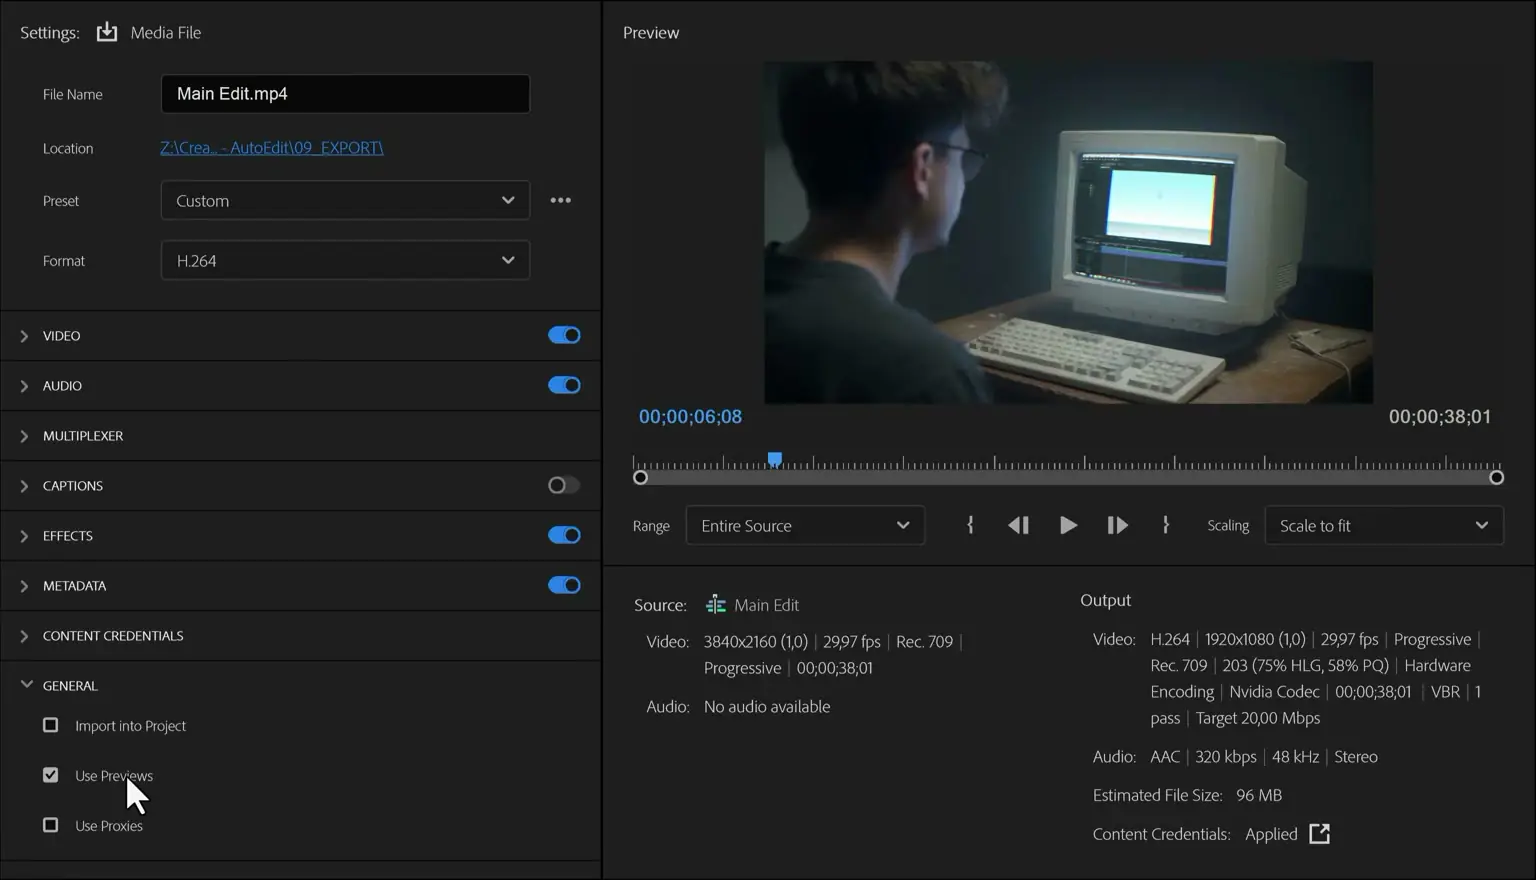
Bonus tip: those renders can speed up your export too. Open Export, scroll all the way down to General and tick Use Previews. Premiere then reuses the rendered previews instead of calculating every effect again. Free speed.
12. Lower the playback resolution
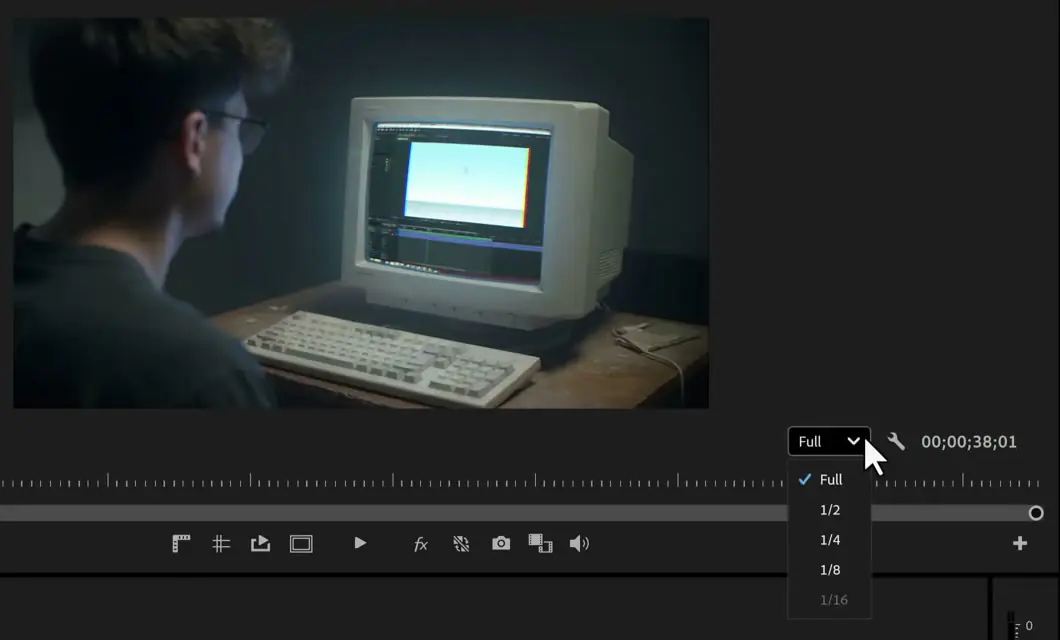
Another way to fix slow playback is the resolution menu at the bottom right of the Program Monitor. It says Full by default. Drop it to 1/2 or 1/4 and the preview gets a bit softer, but it plays a lot smoother because Premiere has fewer pixels to calculate for every frame. It only changes your preview. Your export stays at full quality.
If it still stutters after rendering and lowering the resolution, my 5 tips for better performance in Premiere Pro go deeper into your settings.
Where to go from here
Pick three of these Premiere Pro tips for beginners and use them on your very next edit: Motion in the Program Monitor, I and O in the Source Monitor and rendering with Enter save you time from day one. Once they feel natural, my Premiere Pro course for beginners walks you through the whole edit, from importing to export, step by step.
Jordy Vandeput
Founder of Cinecom · 2.75M+ subscribers on YouTube
Jordy Vandeput is a Belgian filmmaker who has taught practical filmmaking to millions through Cinecom. He breaks professional techniques down into clear, repeatable steps you can use on your very next project.
Related tutorials
 48K
8:04

FAST And EASY Effects You MUST KNOW! (Premiere Pro Tutorial)
Learn a fast Premiere Pro workflow: remove a building with Photoshop generative fill, mask precisely, animate with Transform, and bend it in After Effects.
 206K
6:31

10 Editing SECRETS You NEED in 2024 (Premiere Pro Tutorial)
Learn 10 editing secrets that will help keep the viewers' attention in your videos in this Adobe Premiere Pro tutorial video.
 91K
7:41
10 Features Only PRO Editors Know About! (Premiere Pro Tutorial)
Learn 10 Adobe Premiere Pro features that will help you become a better editor in this Adobe Premiere Pro tutorial video.
0 comments